Stop hunting random presets. Build a settings workflow that survives a new alloy, a new lens, and a new customer job.
Most bad fiber marks are not solved by one magic screenshot. They are solved by a clean test grid, a stable optical setup, and knowing which variable actually changes the finish.
Speed, power, frequency, and pulse width explain most fiber settings problems.
Beam family
1064 nm
Fiber markers are built for metals. Clear acrylic and wood are not the target job.
Color rule
MOPA first
Repeatable stainless color needs pulse-width control, not another downloaded preset.
Best habit
1 change
Change one variable per grid or you will not know what fixed the mark.
Diagnostic matrix
What are you trying to make the laser do?
Signal
Likely diagnosis
Proof
Next move
The mark is weak everywhere
Focus, wrong lens field, dirty lens, or baseline power too low.
The same weak mark appears in the center and the corners, even on known-good stainless scrap.
Clean optics, refocus, verify the lens profile, then rerun a small speed and power grid.
The center is good but edges distort
Lens correction or field-size setup is off, not material settings.
A square engraves correctly at center but stretches, bows, or shrinks near the edge.
Fix COR file or galvo calibration before saving any material preset.
Black mark turns brown or dusty
Too much heat, too slow a speed, or hatch spacing that overheats the surface.
The mark wipes dirty and the surrounding steel has a heat halo.
Increase speed, reduce power, widen hatch spacing, or try a higher frequency test.
Color appears once and disappears later
MOPA color window is too narrow for your material batch or focus is moving.
A tiny focus change or new blank shifts blue to gray or gold to brown.
Lock focus height, build a pulse-width plus frequency grid, and save by alloy and finish.
The mark is weak everywhere
Likely diagnosis
Focus, wrong lens field, dirty lens, or baseline power too low.
Proof
The same weak mark appears in the center and the corners, even on known-good stainless scrap.
Next move
Clean optics, refocus, verify the lens profile, then rerun a small speed and power grid.
The center is good but edges distort
Likely diagnosis
Lens correction or field-size setup is off, not material settings.
Proof
A square engraves correctly at center but stretches, bows, or shrinks near the edge.
Next move
Fix COR file or galvo calibration before saving any material preset.
Black mark turns brown or dusty
Likely diagnosis
Too much heat, too slow a speed, or hatch spacing that overheats the surface.
Proof
The mark wipes dirty and the surrounding steel has a heat halo.
Next move
Increase speed, reduce power, widen hatch spacing, or try a higher frequency test.
Color appears once and disappears later
Likely diagnosis
MOPA color window is too narrow for your material batch or focus is moving.
Proof
A tiny focus change or new blank shifts blue to gray or gold to brown.
Next move
Lock focus height, build a pulse-width plus frequency grid, and save by alloy and finish.
Workflow
The six-step test grid that keeps you honest
A settings library is only useful if you can recreate it. The goal is not to find the hottest mark on the first pass. The goal is to understand the window where your machine, lens, source, and material agree.
The fastest way to waste scrap is to change power, speed, frequency, hatch spacing, focus, and pulse width at the same time. The fastest way to learn is slower: one machine state, one material, one variable family.
01
Name the material before naming the setting
Stainless, anodized aluminum, brass, copper, titanium, coated tumblers, and bare aluminum all absorb and reflect differently. Treat the alloy and finish as the first variable.
Bench proof
Write the material, finish, lens, focus height, and machine wattage on the test coupon.
02
Lock the optical setup
Do not tune settings while the lens, focus, field size, or red-dot alignment is still questionable. A weak mark from bad focus can look exactly like weak power.
Bench proof
Run a small square at center field and at one corner. If size or edges drift, fix setup before tuning.
03
Start with a manufacturer baseline
Manufacturer tables are not final recipes, but they are useful starting ranges. Use them to avoid reckless full-power tests on reflective metal.
Bench proof
Run the baseline on scrap. Keep the first successful mark even if it is ugly.
04
Sweep speed and power first
For black utility marks and deep engraving, speed and power usually move the result the most. Change them in visible steps so the pattern teaches you something.
Bench proof
Build a 5 by 5 grid. Keep frequency fixed until the usable speed and power window is visible.
05
Use frequency and pulse width for finish
Frequency changes pulse spacing and heat behavior. Pulse width, on a MOPA source, changes the energy shape. That is where color, plastic contrast, and delicate finishes become repeatable.
Bench proof
When the mark is close, run a second grid around frequency and pulse width instead of jumping to a new preset.
06
Save presets by job, not by material alone
A black serial number, a polished logo, a color tile, and a 0.05 mm deep engrave on the same steel need different settings. Name presets by the customer result.
Bench proof
Use preset names like 304-black-150mm-lens and 304-blue-mopa-150mm-lens.
Materials
The material playbook
These are not universal presets. They are the decision patterns that keep showing up across manufacturer docs, LightBurn setup notes, and real owner troubleshooting: start with the material failure mode, then tune toward the finish.
Black marks, color tiles, tumblers
304 stainless steel
For utility marks, find a clean black anneal before chasing depth. For color, use MOPA pulse width and frequency as the main tuning pair.
Too much heat makes brown haze instead of black contrast.
Color grids should hold power mostly steady while pulse width and frequency move.
Polished stainless changes faster than brushed stainless, so save separate presets.
Q-switched lasers can mark stainless well, but they are not the right tool for repeatable full-spectrum color.
Wallets, tags, cards, coated parts
Anodized aluminum
Use enough energy to remove or bleach the anodized layer without chewing the base aluminum. This usually wants speed discipline more than brute force.
Run a light first pass before deciding the laser is underpowered.
Thin anodizing can overburn at settings that look perfect on thicker cards.
High-contrast white marks may need a different hatch spacing than logo fills.
Do not trust one Amazon sample card as a universal aluminum setting. Coating thickness drives the result.
Tags, coins, jewelry blanks
Brass, copper, and polished metals
Expect more reflection, more heat spread, and less forgiveness. Start conservative and control where the beam can reflect.
Use clean scrap and wipe oils before judging mark quality.
Deep engraving usually needs slower speed, multiple passes, and more cleanup.
A darker mark may require surface prep or a marking compound depending on alloy.
Reflective metal makes safety controls more important, not optional.
Jewelry, knife hardware, art pieces
Titanium and color experiments
Treat titanium as a color lab, not a production preset. It can produce attractive oxide colors, but each blank and finish shifts the palette.
Run small grids and photograph them under the same light each time.
Use low-to-moderate power and fine changes once color appears.
Store the supplier and batch next to the preset name.
A color that looks stable on one titanium part may drift on the next supplier's alloy.
Troubleshooting
When the mark looks wrong, diagnose the symptom
Settings problems and setup problems can look identical. Before you blame wattage, prove the optical setup is stable and the material is known-good scrap.
Diagnostic matrix
Settings failure matrix
Signal
Likely diagnosis
Proof
Next move
The mark is weak everywhere
Focus, wrong lens field, dirty lens, or baseline power too low.
The same weak mark appears in the center and the corners, even on known-good stainless scrap.
Clean optics, refocus, verify the lens profile, then rerun a small speed and power grid.
The center is good but edges distort
Lens correction or field-size setup is off, not material settings.
A square engraves correctly at center but stretches, bows, or shrinks near the edge.
Fix COR file or galvo calibration before saving any material preset.
Black mark turns brown or dusty
Too much heat, too slow a speed, or hatch spacing that overheats the surface.
The mark wipes dirty and the surrounding steel has a heat halo.
Increase speed, reduce power, widen hatch spacing, or try a higher frequency test.
Color appears once and disappears later
MOPA color window is too narrow for your material batch or focus is moving.
A tiny focus change or new blank shifts blue to gray or gold to brown.
Lock focus height, build a pulse-width plus frequency grid, and save by alloy and finish.
Deep engraving leaves heavy burr
Too much removal in one pass or insufficient cleanup pass.
The edges feel raised and sharp after a single aggressive pass.
Use more passes at less heat, add a cleaning pass, and test a different hatch angle.
The downloaded preset does nothing useful
Different wattage, lens, source, pulse width range, alloy, or focus.
The preset came from a different machine or an unlabeled screenshot.
Use it only as a direction. Rebuild the grid on your machine and material.
The mark is weak everywhere
Likely diagnosis
Focus, wrong lens field, dirty lens, or baseline power too low.
Proof
The same weak mark appears in the center and the corners, even on known-good stainless scrap.
Next move
Clean optics, refocus, verify the lens profile, then rerun a small speed and power grid.
The center is good but edges distort
Likely diagnosis
Lens correction or field-size setup is off, not material settings.
Proof
A square engraves correctly at center but stretches, bows, or shrinks near the edge.
Next move
Fix COR file or galvo calibration before saving any material preset.
Black mark turns brown or dusty
Likely diagnosis
Too much heat, too slow a speed, or hatch spacing that overheats the surface.
Proof
The mark wipes dirty and the surrounding steel has a heat halo.
Next move
Increase speed, reduce power, widen hatch spacing, or try a higher frequency test.
Color appears once and disappears later
Likely diagnosis
MOPA color window is too narrow for your material batch or focus is moving.
Proof
A tiny focus change or new blank shifts blue to gray or gold to brown.
Next move
Lock focus height, build a pulse-width plus frequency grid, and save by alloy and finish.
Deep engraving leaves heavy burr
Likely diagnosis
Too much removal in one pass or insufficient cleanup pass.
Proof
The edges feel raised and sharp after a single aggressive pass.
Next move
Use more passes at less heat, add a cleaning pass, and test a different hatch angle.
The downloaded preset does nothing useful
Likely diagnosis
Different wattage, lens, source, pulse width range, alloy, or focus.
Proof
The preset came from a different machine or an unlabeled screenshot.
Next move
Use it only as a direction. Rebuild the grid on your machine and material.
Buying logic
The machines that make settings work easier
A better settings workflow cannot add MOPA to a Q-switched source or turn a 110 mm field into a tumbler machine. Buy for the output you want to repeat, not the first sample you want to test.
Best settings learner
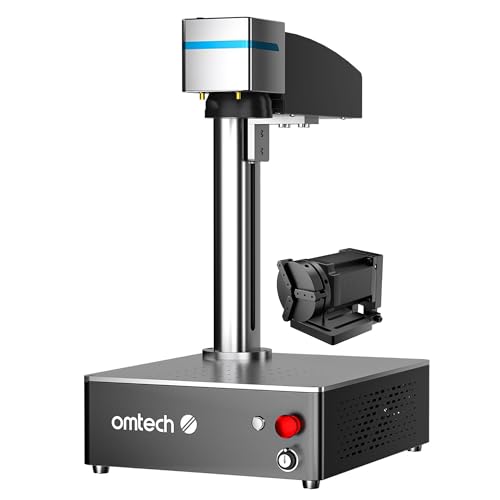
OMTech 30W JPT MOPA Fiber Laser Engraver
8.4
$699
Use when
You want a JPT MOPA source, enough wattage for serious hobby work, and a community-friendly path into color marking.
Skip when
You already know 30W throughput will become a business bottleneck within months.
Manufacturer parameter tables are starting points, not guarantees. Official setup documentation matters because a bad lens profile or focus height can mimic a bad material setting.